Refinishing Hardwood Floors
Hardwood Floor Refinishing Bergen County NJ will restore the luster to your hardwood floors and extend their life. To ensure a successful project, prepare the room by closing vents and doors, sealing the floor with plastic sheeting, and removing base shoe molding (also known as quarter-round) along the walls.
Water drop tests can indicate when a protective finish is worn and your hardwood floors need a refinish.
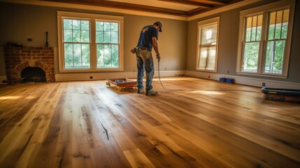
Sanding is the most labor-intensive part of refinishing hardwood floors. It removes the existing finish, sands out scratches, gouges and other irregularities in the wood and prepares it for staining or finishing. The refinishing process will typically take a day or more, and you’ll want to make sure that all furniture is removed from the room before it starts. During this time, you’ll want to cover any doorways with plastic sheeting so dust won’t escape into other areas of the house. It’s also a good idea to tape up any floor registers and close windows. You’ll need to wait at least 24 hours before walking on the refinished floors and should wear socks if you have any. This is to prevent the strong odor of the finishes from irritating your skin and lungs.
Before sanding, vacuum the entire surface of the hardwood floors to remove any dirt and debris that may have accumulated. Then, use a tack cloth to clean the floors and remove any remaining residue. This step is important because it ensures that the final product will be free of impurities and blemishes.
The sanding process itself can be tedious, but it’s important to follow the directions on your sander to ensure that you get an even finish. Start with a 40 grit belt and sand the entire surface of the hardwood, then move up to 60 and 100 grit. You may need to repeat this step multiple times to achieve the desired smoothness. When you’re finished, sweep the floor and check for missed patches or other defects.
During the sanding process, it’s best to keep pets and children away from the work area. Not only can their dander irritate your sensitive lungs, but they can also run across wet sanding dust and become covered with it. Once the sanding is complete, you’ll need to clean up the work area thoroughly to remove any lingering dust and residue.
After the sanding is complete, you can apply a finish to protect your hardwood floors from water and daily wear and tear. There are many different finishes available, from matte to high-gloss. Choose a finish that suits your style and needs, keeping in mind that a higher-gloss sheen can magnify small imperfections on the floor.
Staining accentuates the natural beauty of hardwood floors and can add a warm, cozy feel to your home. It can also cover up sanding marks and imperfections, but it’s important to remember that stain is permanent once it’s dry, so it’s essential to get it right the first time around!
When selecting a stain color, it’s helpful to look at the samples provided by the manufacturer. It’s also a good idea to think about the existing colors in your home, as well as how the wood will be exposed to light, as these factors can affect the final color of the stain.
Before applying the stain, it’s best to clear the room of furniture and rugs to avoid any potential damage or color transfer. It’s also recommended to cover the walls and ceiling with plastic sheeting to protect against splatters or drips. Finally, make sure to open windows and use fans to circulate the air. It’s also a good idea for the person applying the stain to wear a respirator to protect against the fumes.
The most common way to stain a hardwood floor is with a water-based stain. These stains typically offer more color options than oil-based stains and dry faster. They also have a milder odor, making them a great choice for those with sensitive noses or limited ventilation.
Another option for staining a hardwood floor is with a dye. These stains are usually much more translucent than a stain, but they can also be pigmented. Unlike stains, dyes do not need to be mixed with a binding agent and can penetrate the wood at a molecular level.
While it may seem obvious, it’s important to apply the stain evenly in the direction of the grain. It’s also a good idea not to apply too much stain at once, as this can cause uneven drying and an inconsistent color.
When the stain is completely dry, it’s a good idea to apply a polyurethane sealer to help protect the finish and give it a glassy sheen. If you want a darker appearance, it’s also possible to apply a second coat of stain after the first one has dried, but it will require sanding with a fine grit sandpaper in between.
Wood floors can withstand a lot of daily wear and tear. From furniture scrapes and spills to heavy foot traffic and humid conditions, a good quality finish can only do so much to protect the hardwood underneath it. Sealing your hardwood will elongate the life of your finish, restricting the need to refinish and keeping your floors looking beautiful for years to come.
Before sealing, clean your floor thoroughly, removing any dust or debris. It’s best to do this regularly with a vacuum or a mop that has a soft brush attachment or setting to remove fine particles. Debris left on the floor can act like sandpaper, scratching the surface and wearing down your new finish.
Once your floor is clean, sand it again, starting with coarse-grit sandpaper and progressively working your way down to the finer grades. This process will create a smooth surface that is ready to be sealed. Vacuum and wipe the floor down again, removing any residual dust from the sanding process.
When it comes to choosing a sealant, there are many different options on the market. It’s important to choose one that will fit your lifestyle and budget. Penetrating sealers are a great choice for protecting your floors, especially in high-traffic areas. They soak into the wood, giving it protection against water damage, but need to be reapplied more often than other types of sealants.
Polyurethane is a great option as well, providing durable protection and a nice gloss. It’s easy to maintain and is the most popular choice among homeowners. It also gives your floors a rich amber color that will last a long time.
If you’re looking for a more natural approach, be sure to look into the various kinds of bamboo sealants. These will provide a protective barrier against moisture while still allowing the grain to show through.
When sealing your floors, it’s essential that you follow the manufacturer’s instructions. If you don’t, your hardwood may react with the finish, damaging it and turning it into an eyesore instead of a work of art.
Once the floor is sanded and cleaned, it’s time to apply your chosen finish. Before you start applying any product, make sure to vacuum and tack rag the entire floor again, being careful not to miss any spots. This is especially important if you’ve chosen to use an oil-based finish, which will take longer to dry than water-based. It’s also recommended to wear a face mask rated for fumes, as both wood stain and finish can give off unpleasant odors.
Staining is optional, but can enhance the look of your floors and bring out their natural color. If you’re choosing to stain, be sure to follow the directions on your can, and stir constantly throughout the process. It’s also wise to work in a well-ventilated area, as these products can emit strong fumes that aren’t good for your lungs.
For best results, it’s recommended that you use a soft brush and apply each coat in the direction of the grain. Then, wipe off any excess stain and allow to dry completely before reapplying. This usually takes a few days, so you’ll want to plan accordingly.
The final step in refinishing hardwood floors is to seal the new finish. Depending on the type of finish you’re using, this may require multiple coats. Be sure to wait at least a day between each coat, and make sure that the floor is fully dry before moving furniture or putting area rugs back in place.
Whether you choose to use wax, lacquer, or an oil-based polyurethane finish, each will protect the hardwood flooring and provide its own unique aesthetic. Wax, for example, provides a glossy sheen and can be easily touched up, but doesn’t hold up to heavy foot traffic as well as polyurethane.
Engineered wood floors are made from a thin layer of real hardwood bonded to a core of cheaper material, such as plywood. While refinishing engineered wood is possible, it’s important to know that the thickness of the veneer is critical to its ability to be sanded down without reaching the plywood beneath. If the veneer is too thin, it can be damaged by the sanding process and will need to be replaced entirely.
Why Homeowners Choose Window Replacement
Window replacement is a great way to boost curb appeal and improve performance. It can also help save energy costs by reducing drafts and decreasing heat transfer. When you’re looking for the right windows, pay attention to their energy efficiency rating and installation method. It’s essential to get the job done correctly in order to maximize energy savings and other benefits.

The benefits of upgrading to energy-efficient windows are well documented. Whether you’re replacing existing windows or installing new construction, plenty of options offer substantial savings. However, it’s also important to remember that the size of your home and the location of the windows in it will determine how much you can save. To learn more, visit https://www.kelemerbrothers.com/.
Many window companies claim that your new windows will recoup the cost of installation in energy savings alone. This is an enticing argument, but it’s not entirely true. Most of the heat that enters and exits your home is lost through walls, attic hatches, recessed lights, fireplaces and other penetrations in the wall envelope—not windows. Moreover, you can recoup the cost of most window installations in less time by investing in attic insulation and caulking or weatherstripping instead.
One of the most effective ways to improve your home’s energy efficiency is by using ENERGY STAR-rated windows. These are rated by the Environmental Protection Agency and are designed to keep out cold air in the winter and stifling hot air in the summer. Besides reducing your heating and cooling costs, these windows will also add value to your home and offset your carbon footprint.
When shopping for energy efficient windows, look for ones with an ENERGY STAR label and a low U-factor. The lower the U-factor, the better the window’s insulating qualities. You can also lower your energy bill by choosing vinyl, fiberglass or clad wood frames that are insulated.
It’s a good idea to consult with professionals for window installation, especially for energy-efficient windows. An expert will be able to help you choose the best option for your home and install it properly. Incorrect installation can defeat the purpose of having energy-efficient windows and increase your energy bills.
Curb Appeal
If you’re planning to sell your home in the future, you know that curb appeal is important. It’s what attracts potential buyers and helps them make the decision to walk through your front door. It’s also why many homeowners choose to do exterior renovation projects such as Window Replacement, re-siding, and landscaping.
However, curb appeal is more than a simple first impression that makes your house look nice. It’s an ingenious form of marketing designed to make prospective buyers love your home from the outside in.
Luckily, there are a number of things that you can do to boost your curb appeal without investing too much money. For example, a fresh coat of paint can go a long way to improve the overall appearance of your home. If you’re looking for a quick and affordable way to improve your home’s curb appeal, consider hiring one of Mr. Handyman’s skilled technicians to help you repaint your exterior.
Another easy way to improve your curb appeal is by adding a pop of color with new window shutters or planters. Depending on the season, a few strategically placed plants can also add a dash of charm. If you have a front porch, try adding a cozy chair or two for guests to sit and relax.
You can also increase your home’s curb appeal by repairing or replacing the casing, which is the molding that covers the frame around your windows. Casing is an important part of your windows’ aesthetic, and it protects the wood from moisture. If your casing is rotting or missing entirely, our carpentry experts can repair it to give your home a refreshed and welcoming appearance.
For more serious upgrades, you may want to consider full-frame window replacement, which involves removing the old windows and frame down to the rough opening. Our specialists can then seal and insulate the opening to prevent water and air from seeping into your home, which can lead to energy loss. In addition, they can replace the drip cap to protect your windows from rain and snow.
Water Damage
Window replacements can help your home’s structural integrity, but they must be installed correctly to prevent water leaks. These can damage the structure of your house and lead to expensive repairs if left unchecked. If you suspect you have a water leak in your new windows, it’s important to find the source of the problem as quickly as possible to avoid further damage.
The most obvious sign of a leaking window is visible water staining on the wall or sill. However, it’s also possible for moisture to leak into the frame and cause other issues such as warping or paint peeling. If you have water stains, it’s best to hire a professional for a full evaluation of the damage.
Moisture that can’t escape your home may build up over time and create toxic mold. This is a serious issue that can affect the health and safety of your family. If mold is allowed to grow, it can cause severe damage to walls and other surfaces that require expensive repairs or even replacement.
Often, window leaks are caused by simple wear and tear or a lack of maintenance. However, they can also be due to faulty installation. It’s best to hire a professional for your window replacement and installation, so you can be sure that the job is done right the first time.
Another common cause of window leaks is clogged drainage holes or flashing issues. These are small holes in the bottom of the window frame where excess water can drain. Make sure you check these regularly to ensure they are clear of dirt and gunk. It’s also a good idea to regularly inspect the flashing around your windows and reseal as needed.
Another common sign of a window leak is a noticeable change in your home’s temperature. Depending on the size of the leak, this can result in drafts that will make it more difficult to keep your home warm or cool. It can also cause your energy bills to increase significantly as you work harder to compensate for the loss of conditioned air.
Maintenance
A new replacement window is a major investment for any homeowner, so it’s important to keep it in good shape. A few simple tasks can help you extend the life of your windows and ensure they continue to perform at a high level.
One way to do that is by cleaning them regularly. It’s recommended to use non-abrasive cleaners and a soft cloth or rag, rather than harsh chemicals or power washers. Using these tools may damage the surface of your windows and cause discoloration or streaking.
Another way to extend the life of your windows is by preventing moisture and air from entering your home. Moisture can lead to rotting and mold growth, so it’s important to inspect your windows regularly and take care of any leaks or other problems as soon as you notice them.
In addition to cleaning the window panes, it’s also a good idea to clean the frame tracks on occasion as well. These areas are prone to dirt, debris, spider webs, and condensation, all of which can affect the functionality of your windows. For example, moisture build-up can lead to foggy glass or drafty rooms. To prevent this, simply clean the tracks and inspect them for rips or tears that need to be repaired.
It’s also important to look for cracks or chips in the window or frames, as these can let moisture and air into your home. If you find any damaged parts of your windows, be sure to contact a Mr. Handyman of Anne Arundel and North PG technician to replace them.
Finally, it’s a good idea to consider your climate when selecting your replacement windows. High winds and rain can put a lot of stress on your windows, so it’s important to select a style that will be resistant to these conditions.
It’s also a good idea to prepare for your installation day in advance. You should move any furniture or other items that could get in the way, as well as protect your appliances and electronics with a tarp to keep them safe.